(For the latest PDF files Merger Software please have a look at the top of the left margin, inside the red box.) If you are on a broadband and have an old computer or laptop and have a taste of hobbyist tinkerers jobs, you might be eager to become your own host for your website.
(This is a continuation of two previous posts in moving from OL.) That could become more powerful than a purchased hosting. You need to download the
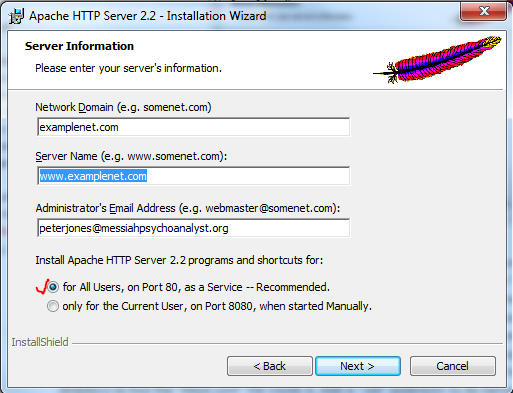
Apache http Server which is a free software (GPL compatible) for serving your website to public. Install Apache server on your old PC. Well, my platform is a Windows XP Professional SP3. I have not tested that on a Unix yet. I'll do it and update this blog. I double click on downloaded software (it is Microsoft Installer file format, .msi). After some routine procedures, this dialogue asks me for some information.
Information I put could be arbitrary. Later, I can configure them if I like. Next I select a custom install.
I have an Apache home directory already in my computer as "C:\JavaHome\ Apache Software Foundation" inside my Java home directory. I change the default of http server to this directory, as "C:\JavaHome\ Apache Software Foundation\Apache2.2"
Yours also could be any directory of your choice. After finishing installation, an "Apache Server Icon" appears on the quick launch tray of your desktop. Inside the Apache2.2 folder there are other folders. Please open "htdocs" folder and double click "index.html" it opens in your default browser showing "It works!" as the sign of success in correct installation of Apache http server. Next to "htdocs" you may notice the "conf" folder. Please open the directory to find the "httpd.conf" file inside it. Add a ".txt" extension to its name (i.e., httpd.conf.txt) to be able to edit the file in a notepad. (Frequently I open many of such files in NetBeans IDE). Find this line inside the document (it is line 179):
You have to change the "DocumentRoot" to your desired directory. I have created a "C:\Web\MyWeb" directory on my old laptop. Hence, I change to:
Please not I made the original one commented out by putting pound (#) in front of the line, and added my own home server directory in its place. I immediately make "C:\Web" directory shared in my Windows "WorkGroup" such that I can work on it from my desktop PC. In this way I never have to go physically to that laptop anymore. This sharing is only on your own Work Group and is nothing to do with public network. Please go further down in the Config file to get to:
Change it as to your newly created root directory of yours,
Now save and close this file and remove the ".txt" extension from its tail back to its original "httpd.conf"
Left click on the "Apache http server icon" on your desktop tray and then click on "Restart" on the drop down menu choices. tool tip text shows "All Apache Services Running" Now start to create your web site. Open "C:\Web\MyWeb" directory and on a note pad create any simple html. Then "save as" it as a index.html, or default.html, or home.html. I am running everything from default.htm as I have transported my web site from Microsoft Office Live (OL) and like to minimize my workload during the transition. I have created all three with similar content. That makes it more transportable. But, please note that "httpd.conf" file has a default of its own as the "index.html" that serves on connection. You know that when you type "
http://www.anexample.org" in your browser. It brings a default page such as "
http://www.anexample.org/homepage.html. " This can be determined in the "httpd.conf" file as we can see,
You can change it to home.html or default.html or comment it out by putting a pound (#) sign in front of the line 242. If you do not create an "index.html" page as your default home page, the
www.anexample.org opens a page with a folder/file tree of your websites including everything you have in the "root directory" you created above. To check that I delete my index.htm page. I have three links here for the test:
http://messiah.dyndns.info/ and
http://messiah.dyndns.info/Home.html and
http://messiah.dyndns.info/Default.html (These as I said could be slow or down due to I turning off the old top.) Later, I explain where "dyndns" comes from.
In the same directory I create four folders as, "documents" and "images" and "cgi-bin" and finally one I need as "PDFs" One might like to have other folders such as "downloads" or "stylesheets" or"JSes" and so on. In contrast to that, I put my css files naked next to index.html, also if any js file. I have none of this type yet. Next I should open the firewall to allow access of the Internet into that server. I log into my router. (I can log from any computer on my hub.) I click on "Port Forwarding Option/Port Triggering" in my NetGear router it is like this:

Your port forwarding could be blank, so you need to "Add Custom Service." Fill the necessary fields, as described. "Server IP Address" is the fixed IP address given by the hub of your broadband router to the old computer that you are using for your home web server. You can find it by clicking on "LAN Setup" on the left hand pane of the router. I found it as "192.168.1.7" for me. It almost always starts with "192.168.0" for all connected device. Mine starts with "192.168.1" for all device. After configuring the "Port" please type
http://localhost/ in your browser (local host is the loopback to your web server) or if you have a "home.html" type
http://localhost/home.html in your browser that takes you to the home page of your "
Home Made" website. Next, "
How your site becomes visible on the Internet?"
(Update : See also this post
Web Hosting at Your Home (Revisited) )